logger(threshold=INFO) -> appender(threshold=WARN)

https://youtu.be/V-kHwLeGsC4?t=580
logger(threshold=INFO) -> appender(threshold=WARN)
https://youtu.be/V-kHwLeGsC4?t=580
Assume Role Way

2. After created user account, it should tell you the ACCESS_ID and ACCESS_SECRET, copy that to somewhere.
3. create iam role. This role needs a policy, which has access to s3 bucket

4. This role should also have trust relationship with user account we’ve just created.

5. In local, run below command.
AWS_ACCESS_KEY_ID=xxxx AWS_SECRET_ACCESS_KEY=xxxx aws sts assume-role --role-arn ${assume_role_arn} --role-session-name "RoleSession1"
Then it will output assume role key/secret/session_token. In order to achieve this, just add assuming this account in this role.
6. Copy thekey/secret/session_token and run below command, it executes s3 operations.
AWS_ACCESS_KEY_ID=XXX AWS_SECRET_ACCESS_KEY=XXX AWS_SESSION_TOKEN=XXX aws s3 ls s3://mybucket

AWS_ACCESS_KEY_ID=XXX AWS_SECRET_ACCESS_KEY=XXX AWS_SESSION_TOKEN=XXX aws s3 cp /tmp/test.txt s3://mybucket
User Way
We can create a user, the user directly has policy to access S3 bucket. ‘

Then we can directly run below command to access to S3 bucket by the user credential, instead of assumeRole. But this way is not recommended way.
rigidity code, modules are coupled. Change in module1, requires change module2, then requires change in module3.
fragile code, change in module1, but it caused issue in other module or system, which is very unrelated to the module1. Bazzare break, weird break. Like your car window can’t be opened, mechanics fixed the window, but the car engine won’t start.
dependencies. I want to use someone’s code. The code does solve the desired problem. But the code also brings other problem, werid data structure, databases. etc.
OO: encapsulation, inheritance, polymorphism
OO weakens encapsulation. Because variable has public/private/protected/default. Original language such as C, just call the function. It was a good encapsulation.
https://www.youtube.com/watch?v=zHiWqnTWsn4&t=2642s
We need to ssh to bastion host, from there, ssh to xxx.ec2.internal host. The configuration in ~/.ssh/config file is like below:
Host *.ec2.internal     // it applies to every *.ec2.internal
  User hadoop     // the default username for final host. hadoop@xxx.ec2.internal,
  IdentityFile ~/.ssh/ssh-private.key    // the private ssh key
  UseKeychain yes
  ProxyCommand ssh username@xxx.bastion-host.com -W %h:%p.     // username, bastion host
So, later we can just simply run “ssh abc.ec2.internal“, it will ssh to it by using the bastion host.
Only putting the private key there, such as:
Host *
  IdentityFile ~/.ssh/ssh-private.key
  UseKeychain yes
One line command is like:
ssh -o ProxyCommand='ssh -W %h:%p {bastion-user-name}@{bastion-host-name}' username@{target-host-ip}
One line command is like:
ssh john@dev.example.com -p 2322
equals:
Host dev
    HostName dev.example.com
    User john
    Port 2322
Then: ssh dev
Below makes ssh remembers the password. You won’t need to type the password again.
UseKeychain yes
AddKeysToAgent yes
Matching order. https://linuxize.com/post/using-the-ssh-config-file/
ssh hadoop@xxxx.ec2.internal -4 -ND 8157
-4, IPv4
-ND, open local 8157 port for tunneling
1. Create an iam role. During creating the iam role, define IAM assume role policy. Assume policy tells who can assume this iam role.
2. Define IAM Policy. Attach IAM policy to this role.


In aws UI, the assume policy will be shown as Trust relationships tab, The normal IAM policy is shown as in Permissions tab.
Below is an example how to use terraform to create role with IAM assume policy, and IAM role policy:
resource "aws_iam_policy" "server_policy" {
  name        = "server_policy"
  path        = "/"
  description = "TBD"

  policy = <<EOF
{
  "Version": "2012-10-17",
  "Statement": [
    {
      "Action": [
        "sqs:ChangeMessageVisibility",
        "sqs:ReceiveMessage",
        "sqs:SendMessage",
        "s3:GetObject*",
        "s3:ListBucket*",
        "s3:PutBucket*",
        "s3:PutObject*"
      ],
      "Resource": [
          "*"
      ]
      ,
      "Effect": "Allow",
      "Sid": ""
    }
  ]
}
EOF
}

resource "aws_iam_role_policy_attachment" "server_policy" {
  role       = "${aws_iam_role.server_role.name}"
  policy_arn = "${aws_iam_policy.server_policy.arn}"
}
Tumbling Windows, fixed window. BI analysis. Only cares about the result within a certain time.
Sliding Window, 有步长,数据可能会重复使用。场景,需要实时分析,给出结果。如股票交易,最近一段时间的交易情况.
Session Window, if long time haven’t received event, then it comes a new window. It’s like timeout.
https://www.youtube.com/watch?v=MSp_w5dnhF4
Flink Watermark, watermark can be treated as a special event. Every event which the time is earlier than watermark won’t come into system.
https://www.youtube.com/watch?v=vijEi9eGtRo
BoundedOutOfOrderednessTimestampExtractor,
Time.milliseconds(), 等待延迟多久发车。如果当前TaskManger中的event time是5s,time是1s,那么延迟是4s,认为4s之前的数据都来了。
TimestampAssigner
AssignerWithPeriodicWatermarks, default每200ms产生一个watermark
AssignerWithPunctuatedWatermarks,
sideOutputLateDate(), do something for dropped data.
Allowed Lateness, the window won’t close with an allowed lateness time.
Flinkd, by default, trigger a process() when a window is generated and closed.
JobManager
ResourceManager, different implementations. Such as YARN, Mesos, Kubernetes resource manager. Can distribute slots of TaskManagers, can’t start TaskManagers
Dispatcher, Can start a new JobMaster
JobMaster, Manage single JobGraph
TaskManager, worker. Resource on TaskManger is called slot
Each task, executed by one thread.
operators are chained by default. Each chain is handled by single thread. Single thread, single slot. Slot is resource group. or subtask.
slots, isolated memory. CPU is not isolated within slot.
Another way is that we still use the ProcessWindowFunction(). By default, it only triggers when a whole window is done. We customize a ViewEventTrigger. It triggers ProcessWindowFunction when each element comes in. Because the window can grow bigger and bigger, we can customize a ViewEventEvictor to evict redundant element.
Use KeyedProcessFunction,
ctx.timerService().registerEventTimeTimer(current.lastModified + interval);
@Override public void onTimer() {}
/**
 * registerEventTimeTimer 是基于Event Time注册定时器,触发时需要下一条数据的水印作对比
 * 需要查看相差的时间是否大于等于interval,大于等于interval则触发,因为已经到时间了,小于interval,不然不会触发定时器,因为没到指定的时间
 * 如果下一条水印不来,就没办法对比时间间隔是否大于interval,也就不会触发
 * <p>
 * 与registerProcessingTimeTimer不同,这个是与机器时间做比对,所以一到interval,就会进行触发操作
 */
public class CountWithTimeoutEventTimeFunction
        extends KeyedProcessFunction<Integer, UserAction, Tuple2<Integer, Long>> {

    private ValueState<CountWithTimestamp> state;
    private final long interval = 60000L;

    @Override
    public void open(Configuration parameters) throws Exception {
        super.open(parameters);
        state = getRuntimeContext().getState(new ValueStateDescriptor<>("myState", CountWithTimestamp.class));
    }

    @Override
    public void processElement(
            UserAction value,
            Context ctx,
            Collector<Tuple2<Integer, Long>> out) throws Exception {

        CountWithTimestamp current = state.value();

        if (current == null) {
            current = new CountWithTimestamp();
            current.key = value.getUserId();
        }

        current.count++;
        current.lastModified = ctx.timestamp();

        state.update(current);
        // 注册EventTime处理时间的定时器
        ctx.timerService().registerEventTimeTimer(current.lastModified + interval);
    }

    @Override
    public void onTimer(
            long timestamp,
            OnTimerContext ctx,
            Collector<Tuple2<Integer, Long>> out) throws Exception {

        CountWithTimestamp result = state.value();

        if (timestamp == result.lastModified + interval) {
            out.collect(new Tuple2<Integer, Long>(result.key, result.count));
            state.update(null);
            ctx.timerService().deleteEventTimeTimer(timestamp);
        }
    }
}
above code is referred from https://blog.csdn.net/qq_33689414/article/details/94619525
checkpoint, savepoint difference
Checkpoint is automatically generated by flink job. It periodically saves in s3 or somewhere.
FsStateBackend vs RocksDBStateBackend
FsStateBackend is memory save only. It’s used when state is small.
RocksDBStateBackend can save on TaskManger local disk, then sync to S3 or somewhere. It’s used when state is large, can’t be handled within memory.
commands
get EMR yarn application id
application_id=`yarn application -list -appStates RUNNING | awk 'NR == 3 { print $1 }'` // get current yarn application id
get flink jobId
job_id=`flink list -m yarn-cluster -yid $application_id | awk 'NR==4 {print $4}'` // get flink job id
cancel flink and create a savepoint
flink cancel --withSavepoint s3://bucket_paty/deployment-savepoint $job_id -m yarn-cluster -yid $application_id
kill all yarn application
for x in $(yarn application -list -appStates RUNNING | awk 'NR > 2 { print $1 }'); do yarn application -kill $x; done
Need to set RETAIN_ON_CANCELLATION. Or checkpoint will be lost when manually canceling flink job.
Also checkpoint still gone when ran command:
flink cancel --withSavepoint
checkpoint persists when manual cancel or killing yarn application.
parallelism is 64, it means it needs 64 slots. If set 2 slot per task manager, then EMR should give us 32 task manager.
Under flink default library, there is WordCount.jar. We can simple run it.
1. launch flink locally
./bin/start-cluster.sh
2. run a job
./bin/flink run ./examples/batch/WordCount.jar
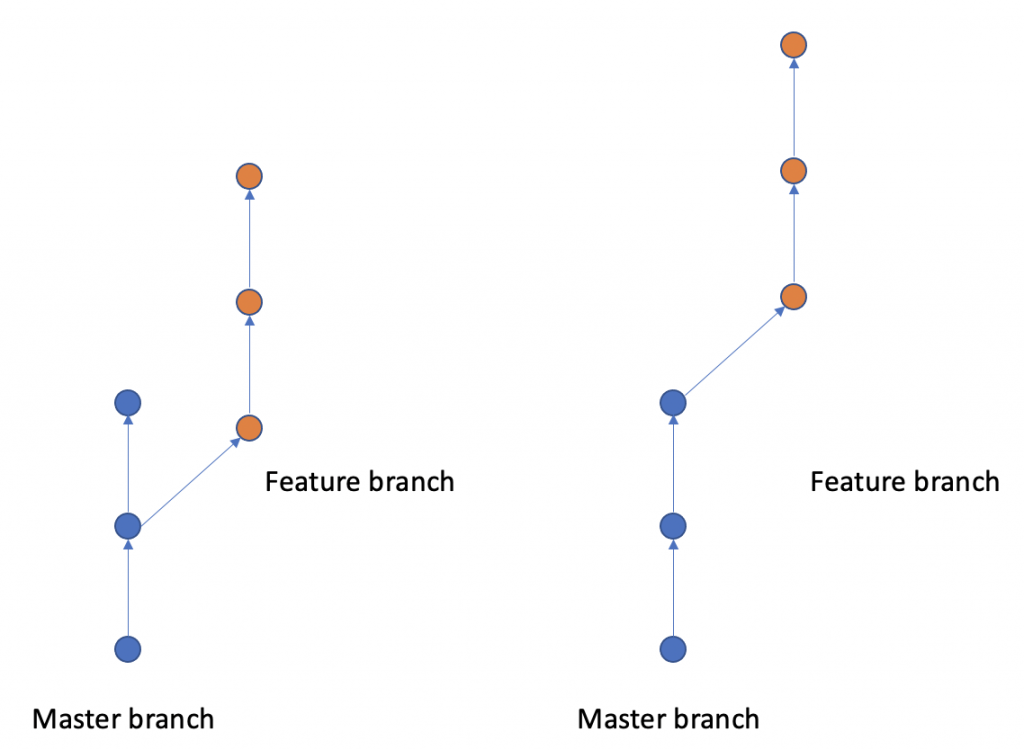
Sometimes, when develop a feature branch, then, we merge back to master branch. This results a ring. This made the merge point has 2 parents. So tracing back the diff would be difficult. The scenario we allow the ring and merge point is that the feature branch is kinda big feature. In the branch, it stores the feature branch developed history. It is good for us to trace back the developing process of feature branch.

Normally, after creating a feature branch. Master branch has a new commit. On develop branch, run “git rebase master”. Then the new commit on master will be added before start of feature branch. This keeps the commit continuously.
After the development on feature branch is done. In master branch, run “git rebase feature_branch”, then the commit on feature branch will be moved to master branch smoothly.
git checkout master
git pull origin develop –ff-only // in local, fast forward local master to same checksum of develop
git push origin master
git push origin –delete branch_name
git remote add origin https://github.prod.hulu.com/USR/srs-reader.git
git remote set-url origin https://github.prod.hulu.com/USR/srs-reader.git
<img src=”https://xxx.png” width=”400″ />